
Days before we offered you a pack of more than 300 icons with flat design style free.
Today to give you a certain game we bring you, this tutorial on how make a pattern very easily in Illustrator. The advantages and resources that patterns give us are endless, from adding a texture to a boring and flat background, to being able to make our own personalized wrapping paper for events, birthdays or packaging orders.
Steps for the Pattern
- The first thing we have to do is create a new work table In Illustrator, in my case I have decided to create a table in A4 size, but you can choose other measurements.
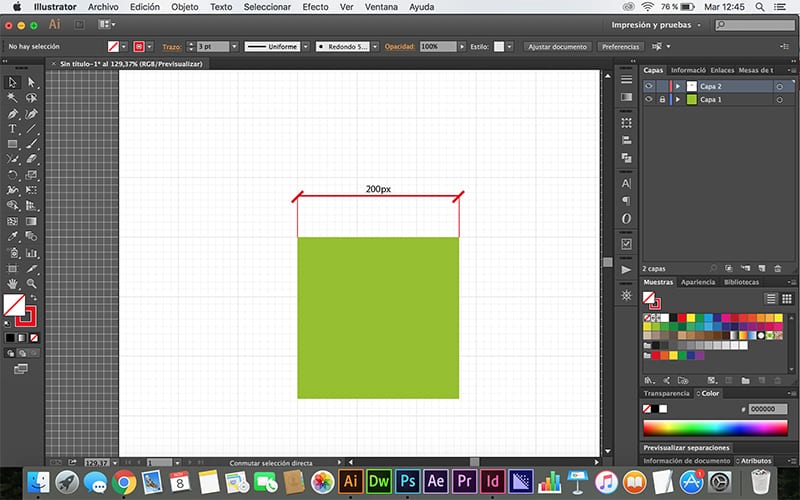
- Inside the work table we must create a 200px X 200px size square, This measurement is indicative, but I advise you to generate a square with a simple number, because later we will have to add it to others.
- Once our square is created we have to go to the tab view -> show grid, and then return to the screen view-> snap to gridOnce this is done, we must adjust the square to the grid itself, we must be careful when moving it so that it does not deform, otherwise the whole pattern will be damaged.
- We choose a indicative color for the square, it is not necessary that this is going to be our final color as it is only indicative.
- We create a new layer In Illustrator and the layer where the square is, we block it, this will act as a guide and will prevent the square from moving during the creation of the pattern.
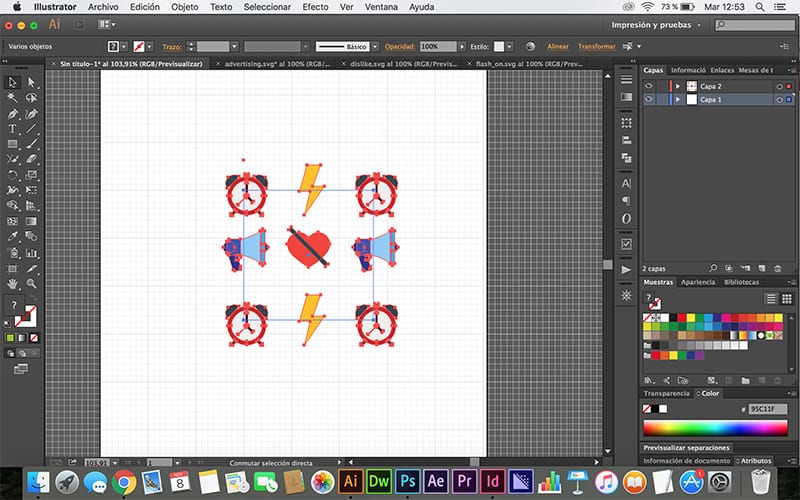
- Everything that is inside the square will be included in our pattern, if it partially protrudes we will have to make some adjustments.
- In case it is in a corner, we must duplicate the object several times, so we give control / cmd + c and then to control / cmd + f To paste it in the same place, if it is in a corner we press the control / cmd + f button three times.
- We select the object and go to transform tab, there we will get a series of coordinates, remember that the X coordinate refers to left and right, while the Y coordinate refers to up and down, in these coordinates we only have to add 200px (square measure) until the corner object was repeated in all four corners.

- If objects only protrude from one side of the square we will have to do the same process, only this time so they only have to be repeated on one side.
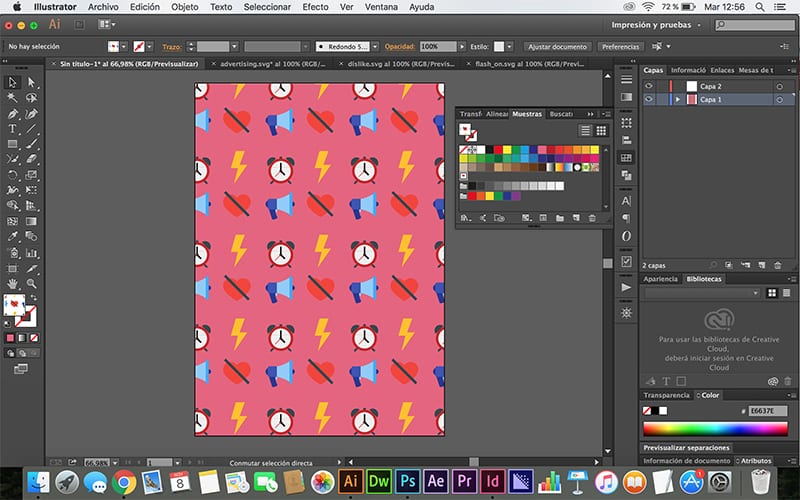
- Once we have our square filled, we unlock the square layer le we remove the color and we select everything, both the icons and the square and directly we drag it to our sample window.
- This sample will allow us to fill in any type of form forming an automatic pattern that will save us a great deal of time.
I have a problem with photoshop, when I transfer the patterns from illustrator to photoshop, I get these lines between pattern and pattern and I have to remove them manually. Is there a way for them not to come out directly?
And yes, before you say anything, I've already joined everything with the trace finder
Hi Ruben, are they very small lines? If so, try to export it without paying attention to the lines, sometimes they are only seen while we are working with the program. But it may be that when you put the square you have put it with a line or so, try to do a test from the beginning if the export does not work for you, you may have forgotten a step, a greeting!