Professional blur techniques with Photoshop to obtain highlight items in an image in the editing process through the photographic retouching program par excellence. Get to work the blur of Photoshop of a precise and professional way managing to improve the result of your photographs.
El blur of Photoshop It can be used for many things: creating perspective, vanishing point, drawing the attention of an element, hiding parts of an image, and all kinds of retouching that will allow us to achieve some more professional and attractive photos. Learn a little more about photo retouching with this post essential.
A blur is a fundamental element if we want get depth in an image and give a major importance to the elements in focus, thanks to this blur our eyes direct their gaze towards certain parts of the image, thus achieving a different reading of photography.
We can use a blur to give importance to a specific part and very accurate of an image such as highlight a look, a flower and any element that from our point of view has a greater degree of importance in the composition. You can also use a blur to hide the identity of a person, This is something very used in social networks by parents who upload photos of their young children. If you want to learn some pretty interesting techniques, keep reading this post.
We will learn the following in Photoshop:
- Apply general blur to a picture
- Specific blur in an area
- Achieve depth using a blur
- Hide identity of a child using blur
General basic blur
The first blur that we must control is the general basic where we will blur the whole image without complicating our lives too much. On many occasions we will be interested in creating a general blur to remove the general prominence from the image, this can be very useful for the creation of backgrounds for photographs.
The first thing we have to do is open our image in Photoshop.
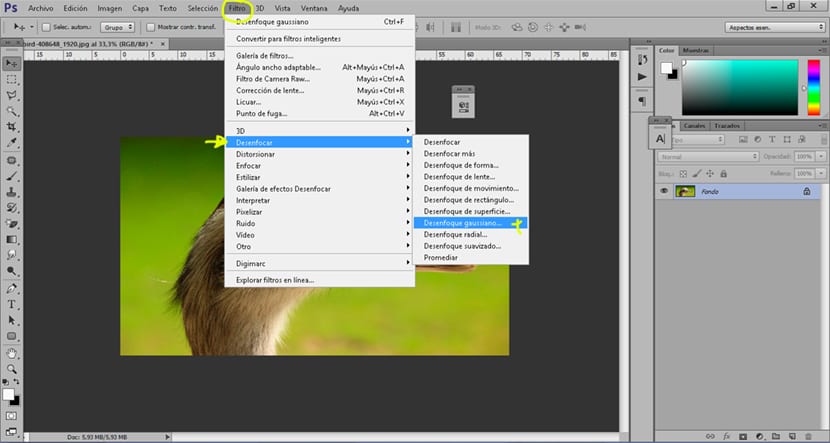
Once we have the image open we have to go to the top menu and look for the option to Gaussian filter / blur / blur, pressing this tab will open a new window where we can choose the degree of blur that we want to apply to the image.
Specific blur to highlight an item
If we want highlight a specific part of a photo we can do it also using the gaussian blur but following a different process.
- We duplicate the layer principal
- We apply a gaussian blur on the duplicated layer
- We put the unfocused layer below the focused layer
- We apply a vector mask on the focused layer
- La focused layer goes above the unfocused layer
These are the steps that we are going to follow in this type of blur, although it seems a mess it is a very easy process to carry out. Let's see it better step by step.
We duplicate the main layer
We open our image in Photoshop and we duplicate it, after doing this the next thing we should do is change names to the layers for work in a more organized way, in this case we will name the layers as follows: layer in focus, layer out of focus. We have to make sure that the unfocused layer is below the focused layer.
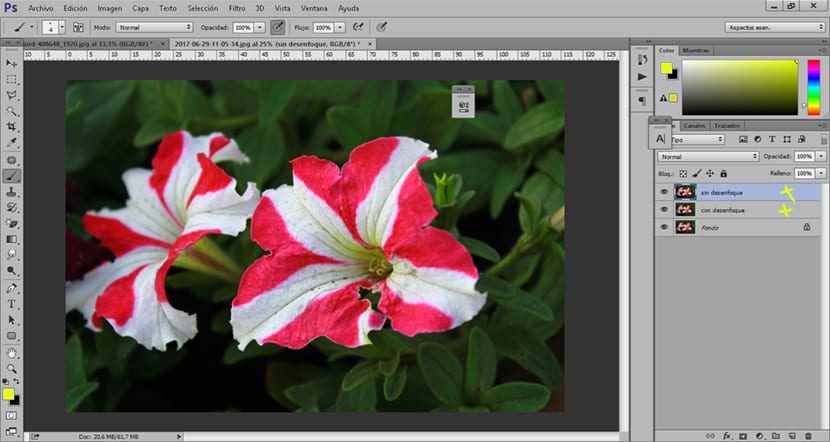
We apply a Gaussian blur on the duplicated layer
We select the duplicate layer named as "Layer out of focus" and we apply a Gaussian blur. To apply the blur we go back to the upper window of Photoshop.
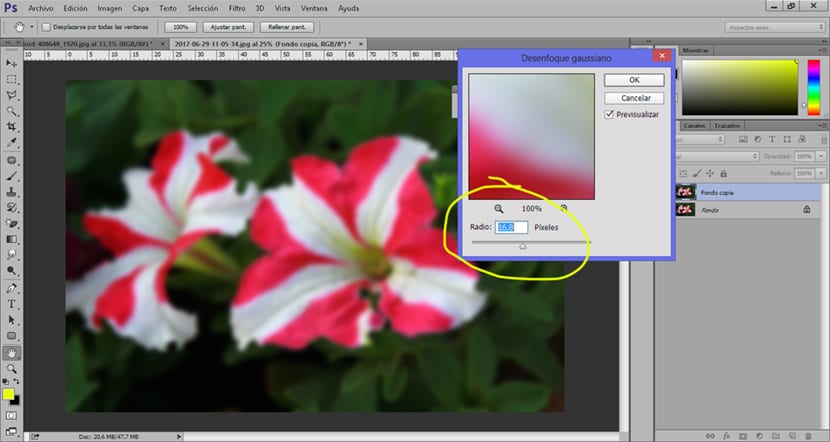
The next thing we have to do is create a vector mask on the focused layer (upper layer) in this way we will erase parts of this layer getting leave bottom layer visible (out of focus) you get a blur effect only in the areas that we delete. It's a pretty easy way to apply more accurate blur.
Create a vector mask
To create a vector mask all we have to do is select the focused layer and click on the icon at the bottom of the layers.
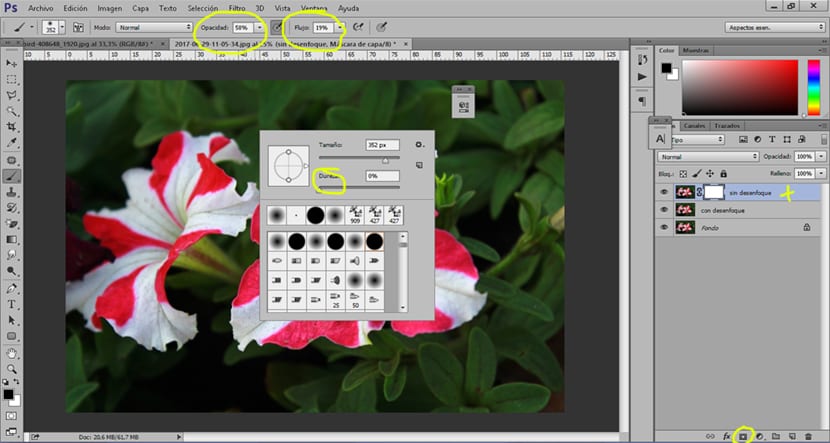
The process is quite easy all we have to do is play with brush values, the most normal and recommended is to put the fairly low values so that the effect is more subtle and to be able to work the effect little by little.
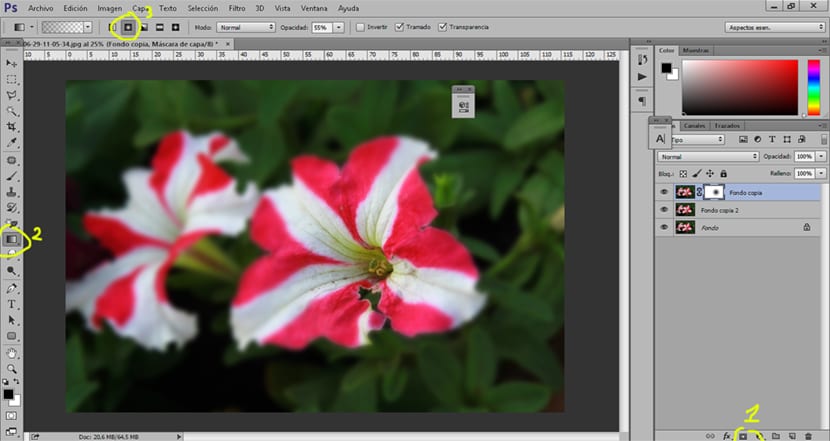
We can create a interesting effect if instead of using the brush to erase parts of the image we use a radial gradient. The work process is the same, the only thing that changes is the use of the gradient tool as we can see in the image.
Get depth using a blur
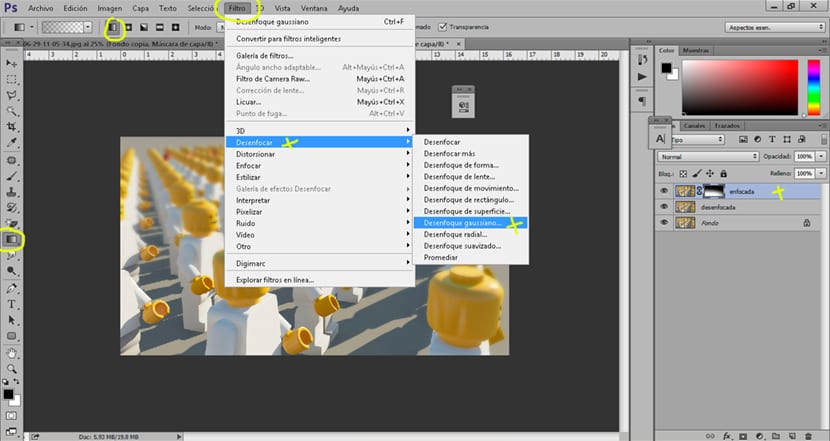
If we want to get depth of field using a gradient what we have to do is apply a blur on one of the layers and a vector mask, it is the same process that we have done previously in the other images. The only new thing we have to do in this part is create a linear gradient in such a way that the blur achieves a progressive gradient.
Hide a child's identity using blur
Today is very normal censor children's photographs before uploading them to the network, either For security for any other reason it is interesting to know these types of effects that can help us on some occasions.
The process is very simple, all we have to do is duplicate main layer and select the elliptical marquee tool de Photoshop. When we have the tool sectioned, we will create a circle on the child's face to later apply a gaussian blur in the same way that we have seen previously in this mail.
- Double layer
- Select tool elliptical frame
- Create selection from the child's face
- Apply gaussian blur

Work blur Photoshop it is something very easy and fast, all we have to do is learn to master the multiple tools provided by the program, in this case we have only used one of them but learning to master concepts and ways of working basic and necessary for the Photo retouching.
El photo retouching trick with Photoshop It is not knowing how to do something but combine what we know in such a way that we manage to create new things. Feel free to research the program after learning something new.
Very good techniques ... to practice some