
To create different photo effects with a normal shot, we will need photoshop. It will always be photoshopped. One of the most used effects for instagram now is to make parts of the body disappear or make it levitate. But it will not only be that, you will also need two photographs almost equal
A priori, when viewing the photographs of artists on social networks it seems something very complicated. But after this tutorial, you will do it fluently. And you can be the envy of your friends! I am going to give a real example of what I have done myself, to give us an idea.
Now if you have an idea of what I'm talking about, right? As you will see, not only is my body retouched, but there is also light, shadows and some details such as smoke or the back wall. And although we are also going to name it, it will not be the most important thing in this article. We will focus on what we have to do.
First, photography (with tripod)
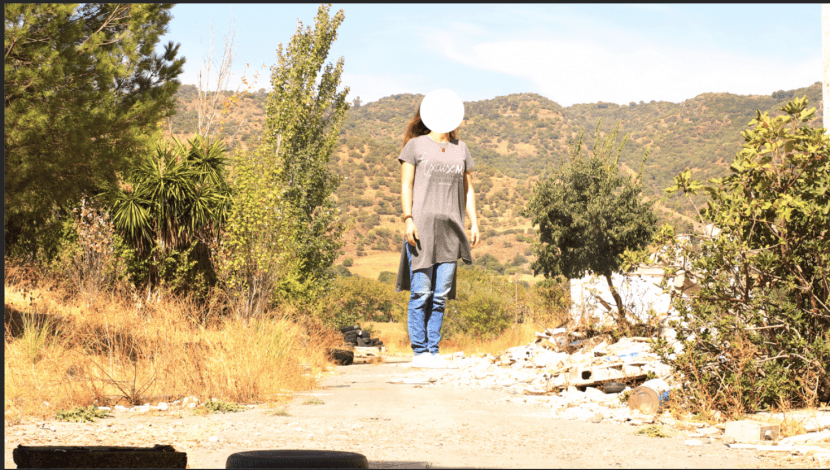
To be able to work on a photograph of this type, you have to choose the environment and take a double photo. What do we mean? Well, you will have to take a support point and position the photographed with the object going into action. That is, if you want him to levitate, you will have to position the person with some «stool»Below to have a necessary height. As I am going to show you in the following photographs. It must be emphasized that it must be with a tripod and a totally static photo because in the manipulation both photographs will have to be completely the same. Now you will see.
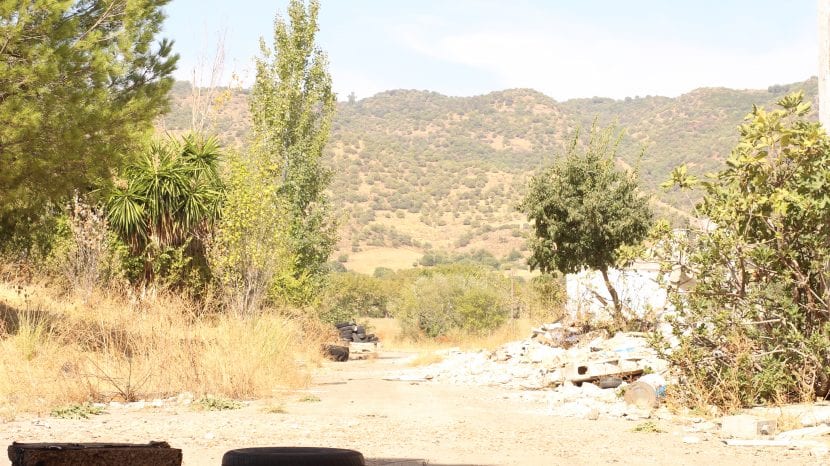
After this, remove the photographed and their respective support from the photo frame As we will show in the following image, which will be used as a reference in order to eliminate part of the main image and create this levitation effect. After having obtained these types of photographs, we can store our camera in the backpack, get into the corresponding vehicle and go to the screen of the computer that we touch. For this I will use photoshop, although programs like Affinity may also work for it. I chose a new image for this scenario and we will work with it.
(Sorry if the photo is very burned)
Accessing Photoshop
We add the image with the protagonist to the main Photoshop screen and in another tab we put the image only with the background. Then we drag the background image to the tab with the main image of the model and place the layer below (thus seeing the main image).

'Group 1' is nothing necessary in this process, they are only attempts made previously.
Tools to use
The tools are very simple: Use a layer mask and a brush. It is recommended to use a normal brush, unless it is a peculiar object that you have used as a reference. Normal, 100% opacity and voila.
The layer mask tool is used to hide or display the layer on which it is used. The mask has many uses and is very useful. We will leave a link to show you how it would be

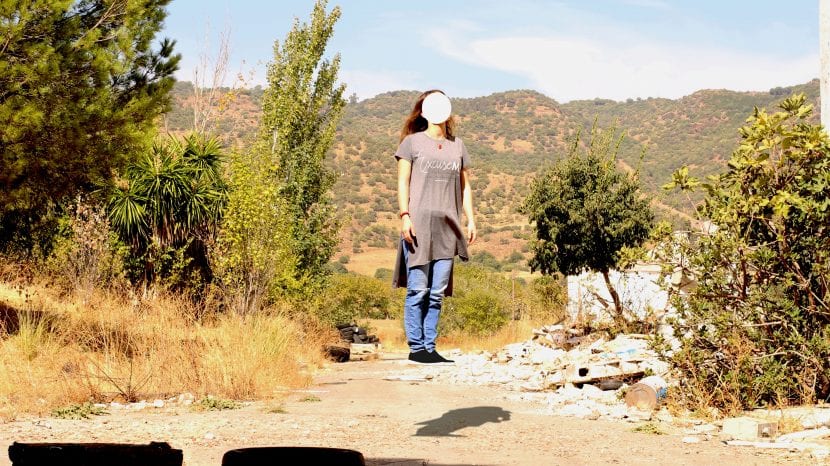
Well, if we go on the main layer, we add a layer mask, in the lower right button of photoshop (as shown in the previous image in red). Once created we work on it. We will configure the color blades. Black front color and white background color. As the video explains, black is used to hide. Of course, the layer mask must be blank, in order to work on it. If everything is ready, we take the brush, the shape you choose, with an opacity of 100% and we go to the area to hide. In this case study, we will remove the barrel so that the girl looks like she is levitating in the air.

Each of the edges of the deleted object will have to be well outlined if you want to achieve a realistic touch. Try not to eliminate other areas of the image that are more necessary such as the girl's feet. Of course, if you make a mistake, you can rectify by switching the foreground and background colors. Putting the white front and the black background and passing the brush through the erroneously eliminated area.
Some extra touches
When you have everything well outlined you can retouch the image a bit, as you will see here it is somewhat burned, we are going to give small examples of how to outline the image so that it comes out better.
The HDR system or Hyperrealism or Leftovers / highlights is the most common in this type of photography. If you don't want to burn your head a lot, go to these tools and you can have a more professional and faster touch. It is something similar to the application filters, with a more subtle touch -perhaps-. These tools are in Image / Adjustments, as many of you already know. Another tool that is also widely used are levels and curves (located on the same tab). If your photo is burned -as is our case-, it will make it darker a bit more and not look so bad. But don't abuse them either, it could look very unreal.
Another way is also to play with brushes or the filter tools. If you drag a brush over a specific area and then choose the type of mask that you give it, (soft light usually works to soften the brushstrokes that are given to the image) you could create the effect you are looking for. Here I give you an example of the original image and the retouched image, as you can see you get something less heavy in sight. Although much more can be improved. Even, like now, to place a shadow that did not exist before.
Photoshop Basic
Surely many of you who follow the networks on a daily basis have seen this effect and wondered what it would be like, because as you can see, if it is basic photoshop. It doesn't take a lot of time to create and not many tools to use, just a brush and layer mask. That is easily achieved with photoshop. Many pages have them. The normal thing in this type of process is that problems appear in the first attempts, in the comments you can leave your doubts and I will gladly answer so that you have a satisfactory result.
David duque