
Fun effect with Photoshop to create big heads with all those photographs that you want to give them a funny and personal touch. This effect is great for those family or friends photos that they seek to have a different memory of all those big moments.
Learn how to create a very attractive effect that you can use in all kinds of photos, from photos of friends to graphic projects that require an aesthetic similar to the queen of hearts style from Alice in Wonderland.
Photoshop is the quintessential photo retouching program that achieves true wonders very realistic, but not everything has to be realistic, right? we can create fun effects where the important thing is the fun touch that the image acquires, in this case we are going to learn how to create a fun stubborn effect.
The first thing we have to do is open our image in Photoshop, in the case that our photograph has a background we must erase it in order to create the effect.
Clear the background
We can erase the background in different ways:
- Using the magic wand
- Magic eraser
- Selecting the figure and erasing the exterior
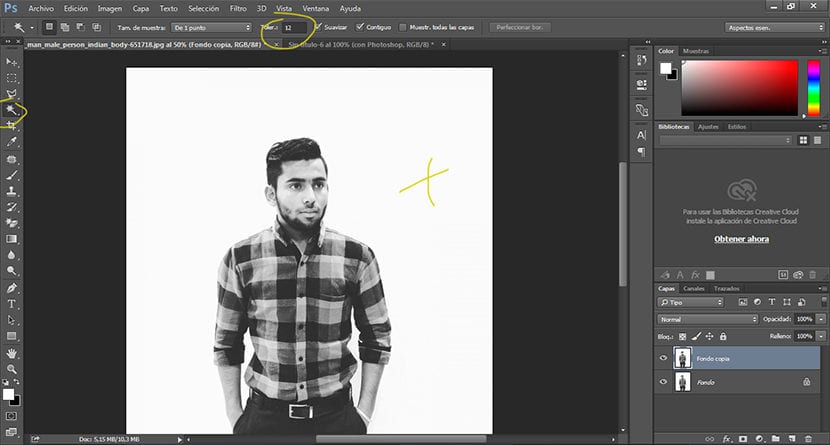
Erase background with magic wand
We can erase the background in different ways, depending on our photography we can choose one system or another. In the case of the example we have used the magic wand tool because it is a smooth background, to use this tool we only have to select it and click Basically, we can change the tolerance to make it more or less precise.
Erase background with magic eraser
If our background is smooth we can use this tool to quickly erase it without any difficulty. To use this tool we just have to select it in the sidebar and click on the background.
Clear the background by selecting the figure
The most common way to erase a background is to use a selection tool to later erase the outside of the image, this can be done with any of the selection tools that we can find in Photoshop. A very good tool for selecting is the magnetic loop where little by little we will make a selection of the outline of the image then we go to the upper menu selection / invert to tell Photoshop We want to select everything that is outside of our selection, to finish we press delete and our background will be erased without problem.
Off with his head !
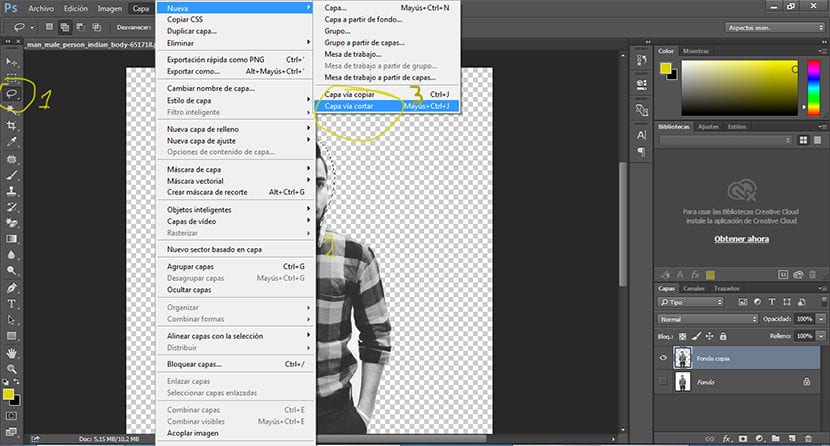
The next thing we should do is cut off our model's head to later be able to separate it into another layer and make the body smaller.
This step is relatively easy because we only have to select one selection tool and contour the head of our model. Once we have this, the next thing we will do is pass it to a independent layer, for this we click on the top menu new layer / via cut. If everything went well we would have to have a new cape with the head of our model.
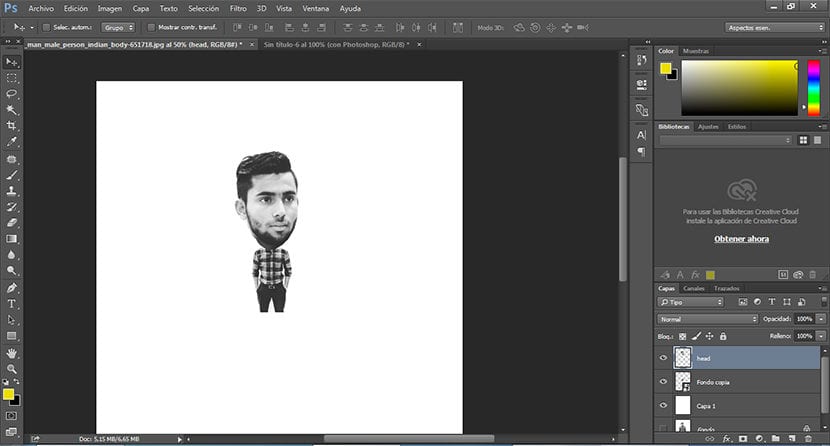
Body reduction
The next step is shrink the body of our model to keep it as small as possible so that the effect is much more fun and the result achieves unleash more laughter.
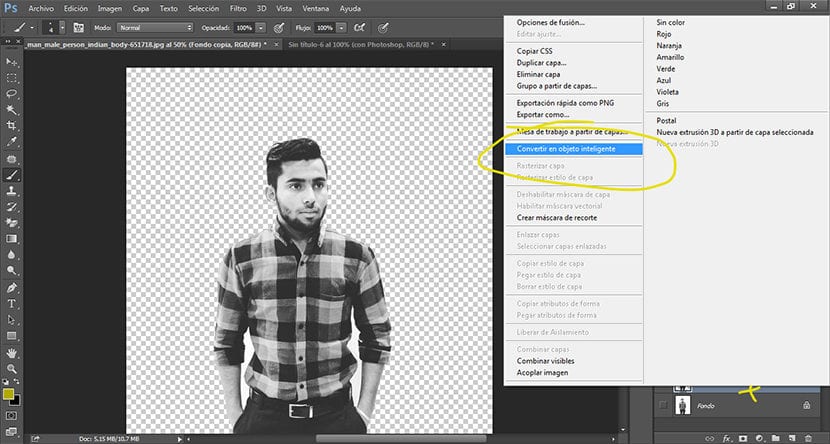
To reduce the body we have to select the layer where we have the body and press the shortcut control + T, we can also go to the top menu edit transform.
Before reducing the body it is ideal to be able to convert the layer into Inteligent object stop this way not lose quality when we are manipulating it. To do this we must click on the layer with the right mouse button and press the option of Convert into smart object.
With a few simple steps we have achieved a funny picture to be able to unleash the laughter of our friends and family in a different way thanks to this fantastic photo retouching program. We must not forget that everything we learn with Photoshop can have different uses, in this case we have done something alternative and fun but on another occasion we may be able to use what we learned in a graphic project, not long ago I saw that effect on a poster of a hairdresser ...
Hello my friends, what a great pleasure to meet with your splendid site.
I introduce myself to all friends: I'm in Mexico
My name is Antonio, 69 years old (how suggestive ha ha) retired for fibromyalgia, and well I have gone (via internet) to learn little by little with photoshop SC6.
Since I discovered photoshop, my pain seems to be less, although in days nothing can be done, but the end of the matter is to have fun and I have done it, and with any little thing done I feel very happy.
Well, as I said, I send you the best wishes from Mexico, and thanks to creativosonline, and here we are looking at each other.
Hello Antonio.
I am glad that you like our articles and find in Photoshop a relief for your annoyances.
I invite you to continue practicing with this program, it is always a good time to continue learning.
Greetings from Madrid.