
Know how to make a gradient in Illustrator It may be one of the most basic knowledge to learn with the program, but it is also one of the ones that can give you the best results. Therefore, if you have not mastered it perfectly yet, this guide can help you learn everything you need to know about the program and the gradient tool.
If you are a beginner with Adobe, or you already knew it but want to delve deeper into it and discover everything you can do with the tool, then we give you the keys so that you understand it perfectly. Are we going to mess?
Que es Adobe Illustrator

Before taking the steps to make a gradient in Illustrator, you must first know what program Illustrator is.
Adobe Illustrator is actually a image editing program. The normal thing is that, when installing Photoshop, Illustrator is also installed and this is so because, unlike Photoshop, it is focused on vector graphics. That is, although you can work with all kinds of images, in reality its application is working with vector graphics.
It differs from Photoshop in that it has easier access to the tools, that gives you versatility and that also allows you to create moving gifs and vectors, as well as logos, drawings, icons and illustrations.
As you can see, it is actually very similar to Photoshop, but focused on graphic design and vectors above all.
What is a gradient in Illustrator
Now that you know what program we are referring to, and what it does, the next step is to know what a gradient is in Illustrator.
In this case, a gradient (whether you do it in Illustrator, Photoshop, Gimp ...) refers to a combination of two or more colors or shades in such a way that they merge gradually, giving rise to a result in which it seems that the color is changing its hue naturally.
This composition achieves an effect that makes the observing public stay fixed in the image, and manages to give a greater depth to the whole (because the message you want to highlight will seem to stand out from its base).
That is why many use it as a color transition, achieving a more natural look and at the same time more captivating.
But, to achieve this, you have to know how to use it, in this case, in Illustrator.
What is the gradient tool
And is that the gradient tool in Illustrator is very easy to find, but it has more "crumb" than you might think at first.
To start with, you have to know that this is in the Illustrator toolbar, that is, to the left of the program. In it you have to locate a button that is a square that goes from black to white as a gradient. If you press you will make it activate.
However, there is not the thing and that is that, when it is activated, you get a special panel that says "Gradient", which is the Gradient panel.
In it you are given a lot of information, but it is easy not to know what it means, so in the Adobe help blog they offer us an image in which they explain each of the buttons that appear and what they are for.
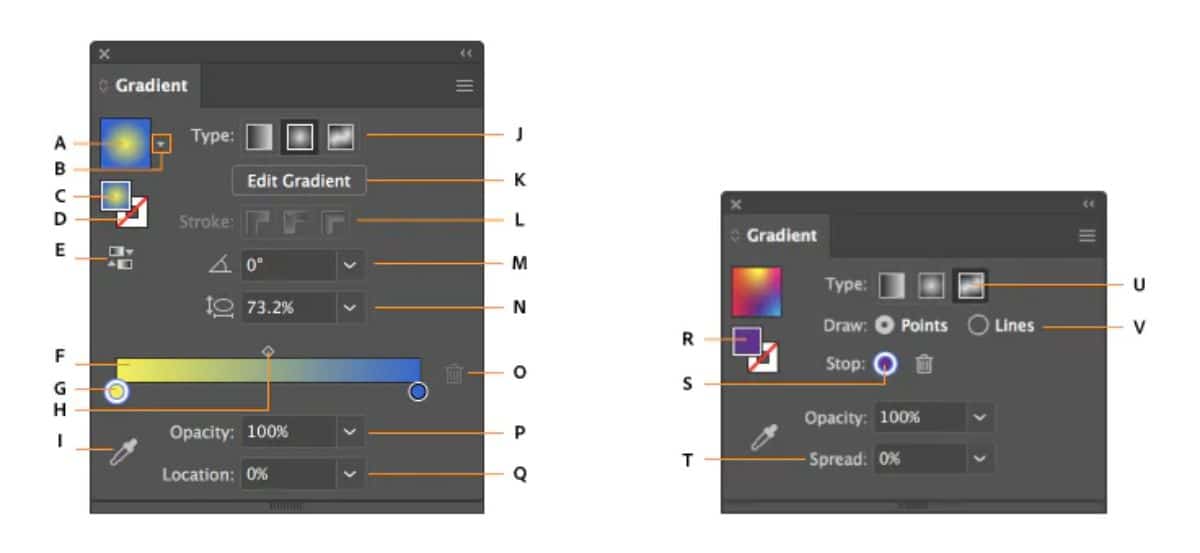
- A. Active or previously used gradient.
- B. List of existing gradients.
- C. Fill color.
- D. Stroke color.
- E. Invert Gradient.
- F. Gradient annotator.
- G. Color stop.
- H. Intermediate point.
- I. Color picker.
- J. Showing or hiding options.
- K. Types of gradient.
- L. Types of stroke.
- M. Angle.
- N. Aspect ratio.
- O. Delete stop.
- P. Opacity of the gradient.
- Q. Location.
- R. Fill or stroke (in color).
- S. Color stop.
- T. Extend.
- U. Gradient with free form.
- V. Freeform gradient modes.
Types of gradients
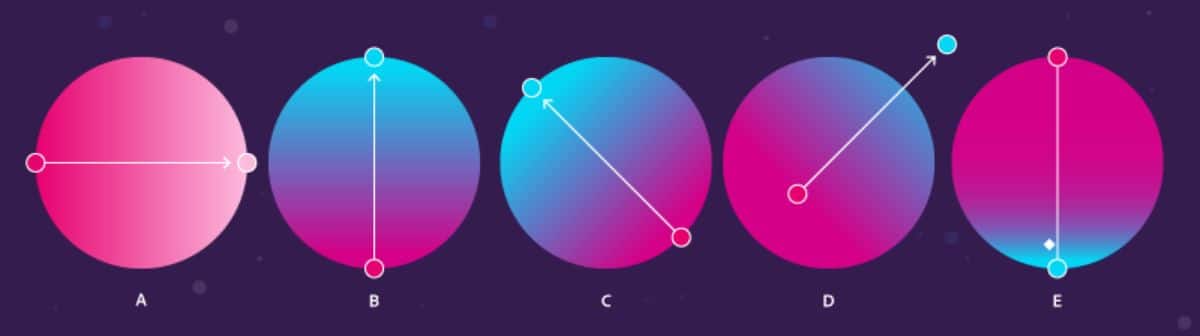
One of the most important options in gradients is the one that allows you to change that gradient, that is, make the color fusion happen in different ways. Specifically, in Illustrator you have:
- Linear gradient. It is the usual and the first that usually comes out. Use a straight line to go from one color to another.
- Radial gradient. In this case, the colors start from the center of the image, tracing a kind of circumference when changing between shades.
- With free form. It allows you to create your own color fusion, applying points or lines.
How to make a gradient in Illustrator step by step
Making a gradient in Illustrator is very easy. All you need to do is follow the steps below:
- Open the Illustrator program and, inside it, a new file.
- Next, in the toolbar, click on the gradient tool. Unless you have used it before, you will get the linear gradient.
- Move the cursor to the new document and click at a point. Without releasing, move the cursor to another point. You will see that a straight line comes out that you can move at will (more to the right, to the left, longer or shorter).
- If you release the mouse button, the gradient will be done automatically.
And that's it!
Yes, for change gradient colorsThe best thing is, in the toolbar, at the bottom you will see two colors (the main and the secondary). If you click on them you can put the ones you want and thus the gradient will be made with those colors.
What if you want to apply different gradients to an image? In that case our advice is that you use the "layers" to determine how each part of the image will behave separately.
Now that you know how to make a gradient in Illustrator, our best recommendation is that you spend a little time familiarizing yourself with the tool and trying to make different designs. In this way you will be able to try everything that we have told you and you will even be able to create your own creations by combining or using other tools. What will be the end result? We would love to hear about it.