Layout of book pages.
When printing a book, many people believe that they can send the content of the text in the Word document in which it was written. However, for a printing company to receive you the gut fileAs it would be said in technical language, you must take into account a series of considerations when configuring and saving it.
It is important to remember that the cover and gut of the book are shipped in two separate files, and that each one has its specifications.
In this article we will explain how should you send the gut file to press.
The first thing you should know
If you are not a designer and you have the text of your book in a Word document, we recommend that you either pass it yourself to a program like Indesign, or commission the work to an editorial designer who can do it for you.
Layout a book is a process where locate all the elements, text, images, titles, headings, numbering, etc., on the pages. If our book is not well laid out, reading may become exhausting, space is wasted, or some elements may be lost or cut off.
Format and indentation
The size of your book will depend on what you have chosen or the designer in charge. It is necessary that they always leave sufficient margins inside the pages, like some 20 mm, and that all important elements such as numbering, heading or any logo that does not go indented, are at least to 8 mm cutting edge. In this way we will avoid losing part of them if there is a cutting error.
If your book does not have bleeding or does not have any items that exceed the borders, the file size can be as low as exact chosen measurement. For example, if you have a standard format of 15 x 23 cm, and it is a novel that does not contain any type of images or graphic elements, the file is configured with those measurements.
On the other hand, if your book has photographs or illustrations, or anything else that comes out of the cutting margins, then you should leave 3mm bleed or safety margins on each side of the pages. In this case, the pages will be 6 mm more in height and width compared to the original size.
If the file is well configured for size and bleed, you don't need to assign crop marks to it.
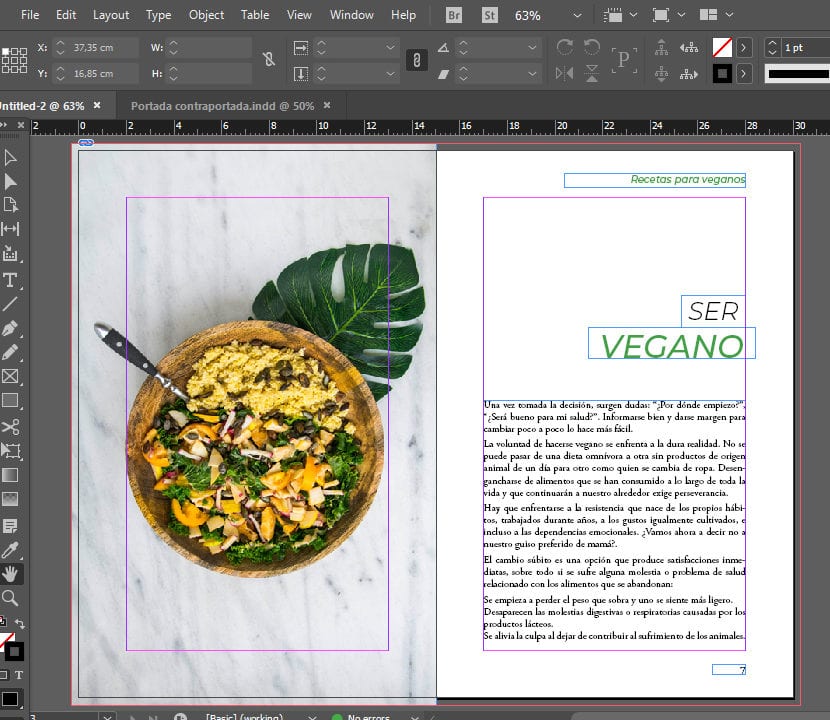
Pages of a book laid out in Indesign with their margins and bleed.
Fonts and resolution
We all know that there are fonts that come by default on all computers, but if you have decided to use any font downloaded from the internet, you must embed it, that is, convert it to a path so that it is not modified or changed when exported. In Indesign, you just have to select the text, and go to Sources> Convert to contour. Make sure to embed it only when you've reviewed the text and don't have any mistakes to edit.
The resolution of the file must be 300 dpi, The same is recommended for all files that go to print, but remember that if you put images or photographs, you should look for them at 300 dpi so that it looks sharp and of good quality.
Color mode and blank pages
If the gut of your book is in color it must go in CMYK mode, and if it's black and white, it should go in Grayscale. Now, if some pages are in color and others in black and white, you must assign the corresponding mode to each one, as long as the printer allows one part to be printed in color and the other in black and white.
It is possible in that case that you should group them by color modes and put them together at the beginning or end of the book, so that they are not interspersed. But since not all printers work the same, it is very important that you first consult the one you are working with.
In all the books there are pages left blank, especially at the beginning or at the end. These blank pages must be present in your file since the printer does not add them, so don't forget to include them.
Blank page of a book, included in the Indesign file
Export to PDF
If you have already configured all the above steps, you are now ready to export your file to PDF. The pages must go separately and never facing or spread pages. Place it in High Quality for Printing, with resolution of 300 dpi and that include bleeding.
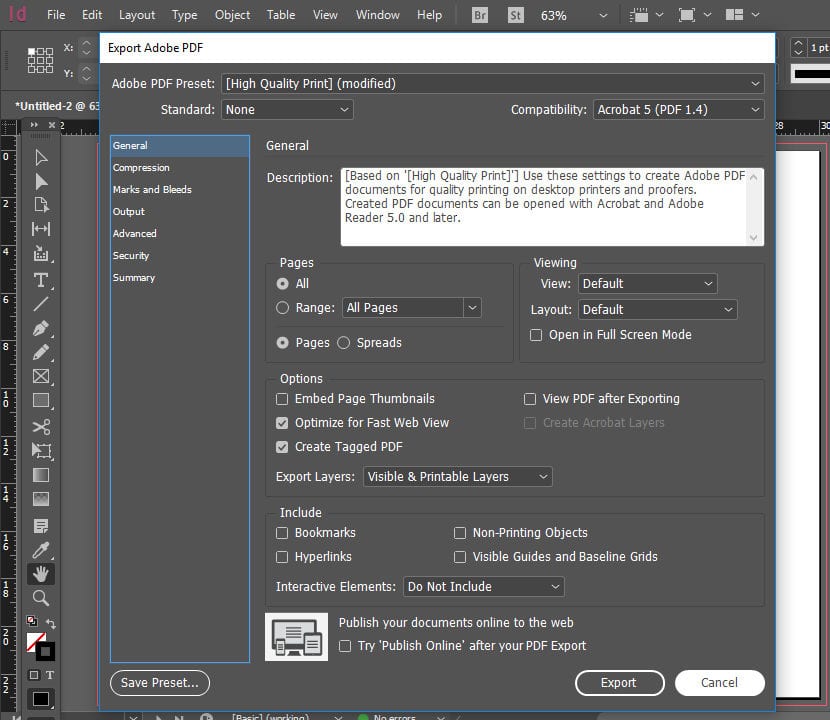
Export file to PDF.
PDF file with separate pages.
And with this you can send your file to the printer along with the file of the front and back cover.