![]()
Surely more than once while browsing Pinterest or Instagram, you have come across images of woodcut logos. This effect is widely used in the branding and graphic identity of certain types of brands, especially meat restaurants, hamburgers, coffee shops or even companies that work directly with wood.
There are many ways to achieve this effect and more if you are using Photoshop, but everything will depend on the result you want to obtain. The logo can be seen stamped on the wood, as if it were burned, Recorded, with a little more depth and relief, and even painted.
In this article we will teach you how to make a logo stamped on wood in Photoshop.
Graphic resources and file preparation
The first thing you should have is a background image make it a wood texture. You can choose the one you like best: lighter, darker, with more relief or with less relief.
You can put the logo in two ways:
- You write it in the Photoshop document on a text layer: Make sure the typeface is large and legible.
- You place it in Photoshop as a PNG with no background, or as a Smart Object with no background.
The important thing is that your logo should always be on a transparent background and in black, whether you have put it as a text layer or as a PNG.
Now in your Photoshop document you only have to place these two elements, and the logo layer will be above the wood texture.
The black logo with no background is on the wood texture layer
The layers you must create
Start by duplicate the logo layer, on the keyboard you can do it with the command CTRL+J, so that you have two of the same.
Between the two layers of the logos, create a new layer and fill it in white. You can do it manually with the paint pot in the tool panel (its command on the keyboard is the letter G), or you can also press Ctrl+Delete and is filled with white automatically.
Select the logo cape which is above the white layer, and combine it with the latter. On the keyboard you can do it with CTRL + E
As a result you will have a white background cape with the logo in black, the next layer will be your black logo on transparent background and the wood texture layer.
Merge the duplicate logo layer with the blank filled layer
The first part of the process
About your cape black logo without background, click by pressing the CTRL key, so that the silhouette of the logo is selected. Then, on the top panel bar, go to Select> Modify> Expand. In the box that appears for Expand Selection, place the value of 1 pixel. As you can see, the selection of your logo on the layer will have expanded 1 more pixel on each side.
Fills the expanded space in the selection with black. You can do it again with the paint bucket, or with the CTRL + Delete command.
Now, about the layer of the white background and black logo, press the command CTRL + I, so that the colors are inverted from white to black.
In the panel bar, go to Filters> Stylize> Wind. In the box that appears for Wind, make sure that the option Wind and From the left are selected. When pressing accept, the edges of the logo will have been moved a little to the left. Repeat this process one more time so that the effect is double. Then do the whole process again, but with the option From the selected right, so that the distortion at the edges is equal on each side. Don't forget to double the effect to the right as well.
Wind filter
Once this is done, re-inverts the layer colors by pressing the CTRL + I command.
In the panel bar, go to Filter> Blur> Gaussian Blur and put the value of 1 pixel. Open the box Levels (CTRL + L) and set the Black Output Levels value to 72.
Select the mode Subexpose color stops the layer and reduces the opacity to 60%.
Burn the color and reduce the opacity
Create a new layer
Once this procedure is done with the white background layer, create a new layer to go above this.
On the layer of black logo without background, click the CTRL key so that the logo is selected. Search Select> Modify> Fader, and in the Fade Selection box, place the value of 2 pixels.
With that area still selected, position yourself on the new layer you created, and fill that space with black. You can do it in CTRL + Delete. Reduce the layer fill to 40%.
On this layer, go to the panel bar, Layer> Layer Style> Bevel and Emboss and make the following adjustments: Style> Outside Miter, Depth> 50%, Size> 20 pixels, Angle> 130 °, Height> 48 °, Opacity> 0%; Shadow Mode> Linear Burn, Shadow Opacity> 22%. Also deselect the Use global light option. The rest of the options are configured the same.
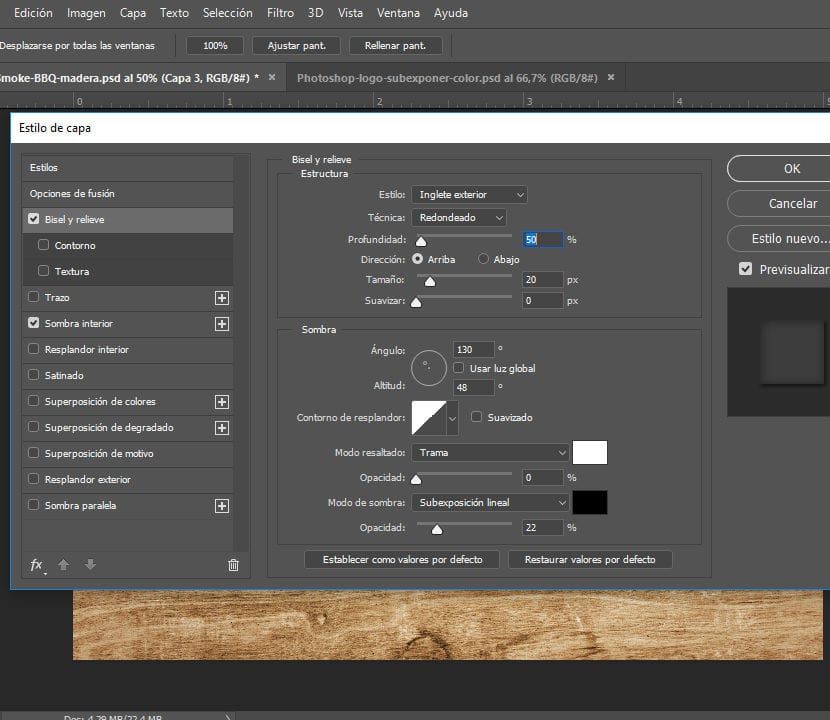
Layer Style> Bevel & Emboss settings
In the same box, go to the option Inner shadow, make the following adjustments: Blending Mode> Linear Burn, Opacity> 10%, Angle> 147 °, Size> 50 pixels. Uncheck Use Global Light. The rest of the options are configured the same.
It is done! Hides the first layer of the black logo with no background and leaves only the top two and the wood texture visible. You already have your logo stamped in wood ready!
Smoke BBQ logo printed on wood