
Sometimes we limit our use of tools due to the knowledge we have of them. For those who are subject matter experts, they will see a endless of design possibilities through Photoshop, Illustrator, Indesign, etc. But without a doubt, for most of us, we do not fully know all the possibilities offered by a program of these characteristics. The pen tool will give many of them.
Whenever we try to play with one tool or another, we end up giving up seeing that our programmed goals in our minds are not able to be reflected on our blank canvas. And for that reason, we look for other options, in most cases, less attractive than we initially imagined. That is why we are going to try to learn how to use the paths.
What are Paths?
Paths allow us to draw curves and lines that are modified and interpreted as vector objects. Shape layers can be used with the Pen tool and the Shape tools. TWe can also create paths that will appear as work paths in the "Paths" panel. Finally we will have the possibility of creating raster shapes that we can color.
When you are a Photoshop user, outlining profiles with this background removal tool is familiar to us. For Adobe Illustrator users, using the Pen tool will be more useful for providing precise tracing and creating original shapes. YesIt is also useful for making selections, since the result can be more precise.
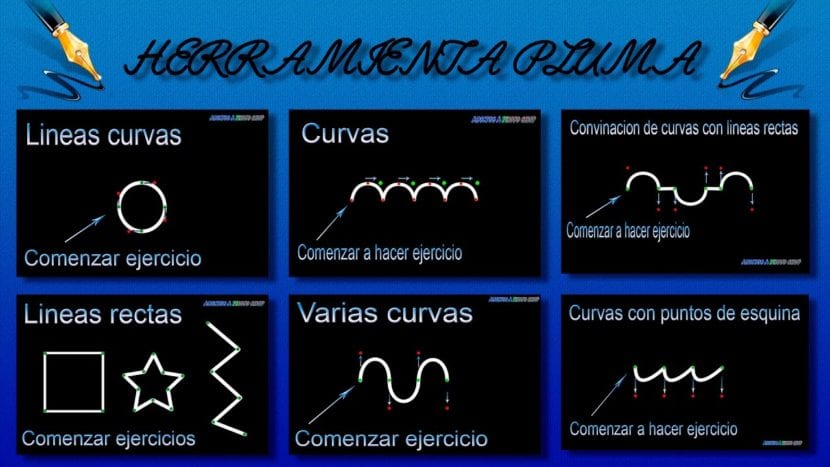
When we create a path, we define an anchor point with each click you make, as well as direction lines whose end ends in a direction point if it is a curved path. The part between two anchor points is a segment. Straight or curved. A path can be open and has ends or closed, and it can be a circle.
Paths in Photoshop can be exported to Illustrator.
Let's learn with the Pen tool
We open photoshop, create a new blank document or an already predefined image. We select the pen tool in the tools panel or directly by clicking 'P'. Although we all know that already. In the tools panel, we will have several options: Path, shape and pixels.

Tracing: The Pen tool will create a vector working path that will appear in the list in the path panel. In order not to lose the paths that we have created when closing the document in question, we must save it.
Forma: This tool will create a shape layer. We can edit the shape color to our liking, in each of its uses. Double click on the thumbnail of the 'Layers' panel. Also add effects like 'Drop Shadow', 'Bevel and Emboss', etc.
Pixels: As you will see, this option does not always work. If you point to the shape tools then that will be when it unlocks. It only works for these. Rectangle, ellipse, custom, etc. Create a pixel layer instead of an editable layer.
We are going to use the Freeform Pen Tool
This free-form tool will allow us to draw freehand drawings quickly. The anchor points are placed automatically and we can retouch later. We are going to select the 'Freeform Pen' tool from the tools panel.
As we have previously introduced, we can create a Shape or Path layer in the top options bar. To draw, simply click and drag like a simple pencil, and when you have finished drawing, release the button. Exactly the same as if it were a freehand drawing.
If you released the button before closing the shape or path, click one end of the path again and drag.
Same as the freeform pen, but magnetic
Ivan hernando
This tool is used largely in the same way as the magnetic loop. -which we will talk about later in another article about it- following as precisely as possible the outline of an image element.
To access the tool, freely press and hold the pen, hence the title. And once we have done it, in the upper options bar, we press 'magnetic'. And you will see how the pointer transforms. With this tool we can select the 'tool' icon, adjust the tolerance between 0,5 and 10. Enter values between 1 and 256 pixels to determine the detection area of the contours.
We can define minimum contrast percentages for contour detection. Using a high value for low contrast images. Specify detection of contours by entering a value between 0 and 100 in the lineatura field. The higher the value, the faster the point placement rate.
We mark the option of Pen pressure, especially if we handle an external graphic tablet to change the width depending on the pressure we exert. If we do not have this tool, it will not be more complicated to do it from a trackpad or common mouse.
You can use many more shapes with the magnetic tool, such as freehand drawing as with the freeform pen. Clicking and pressing ALT on PC or CMD on Mac. Note that this option is not that useful, since with the Freeform Pen you can do it directly, but it is another option. You can draw a straight segment, clicking on ALT or CMD in one of its vertex and even close it, clicking on another point of the segment.
Conclusion
Including in your practice all these options within the Pen tool, you can get more precision and more effects in the shapes you create. Now, click on the tool and start to start your creative process, only in that way will you see in practice all the theory that we have explained here. Doing trial and error without repairing damage.
These guidelines can give you ideas, but they cannot do the work for you, so you can get to know each one of them and inform yourself. And even ask if you have any questions, other colleagues can resolve those concerns. You can also settle for just using predefined shapes and put the complexity of the Pen aside, that, or get it right.