
It is a fact that one of the most tedious and avoided tasks for the graphic designer is the extraction of funds and elements. However, let me tell you that this difficulty is nothing more than a myth. With the tremendous evolution that editing software has undergone, coping with these tasks will be tremendously simple and we will be able to obtain 100% professional results no need to fall into head feeders.
It is a topic that we have covered several times in our blog, however, today we are going to talk about what they are the best alternatives to perform professional cuttings and extractions in record time. In this maxi-tutorial we are going to delve into which are the most important and interesting tools that it offers us Adobe Photoshop to perform extractions:
Using the brush next to the layer mask
If this alternative is characterized by something, it is undoubtedly because it is the one more freedom offers us and that is positioned as an option similar to the eraser tool. Generally, the tools that we can find within Adobe Photoshop to make precise extractions and cuts are characterized by being tools that have certain limits. For example, the polygonal lasso, which we will see later, allows us to make selections and cuts always following a direction in a linear structure. This tool works from anchor points, so once we have created our selection we will have a fairly small editing space. We also have the Lasso tool but this requires enormous ease to make precise cuts (with this tool it is highly recommended that we use a graphic tablet).
However, both the layer mask and the erase tool provide us with instruments capable of creating selections and cuts with total freedom both spatially and temporally because we can always modify the shape of our selection at any time we want. The point against that perhaps these alternatives have is that require greater ease when using our pointer with a mouse or graphic tablet.
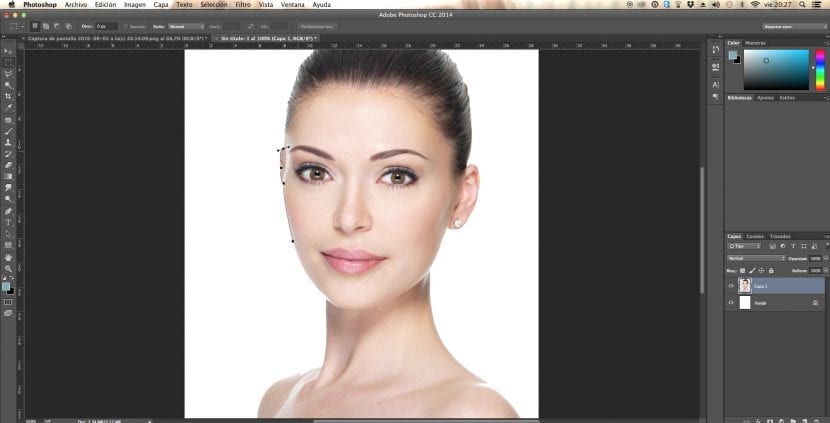
I recommend that each time we opt for any of these options we try to have a graphic tablet at hand since the movements through it will be much more real, easy to control and organic. From this first method we are going to find a method to provide very precise results in trimming. What we are going to achieve from a layer mask is the ability to make the areas or elements that we need from our images visible or invisible. In this way we will be promoting a cut indirectly and what is better with a very wide margin of safety.
When we proceed to make our clipping (unlike what happens with the rest of the methods) using a clipping mask we will not "lose" the area that you cut, but by only hiding it we can restore and edit it at any time. There is a very important advice to take into account, and that is that we must use the one that best suits the work area among the available tools. It is highly recommended that we opt for a small brush because in this way the separation and trimming will be much more precise.
What steps will you have to follow to carry out this method? They are very simple!
- Tool selection brush (You can also access it from the B command from your keyboard).

- Next we must go to the layer on which we want to act and then click on the layer mask button, "Add a mask" which sits right at the bottom of our menu or layer palette.
- The moment we create our mask we will discover that we can place ourselves either on the layer itself or directly about the mask we just created. To modify the appearance of our image and proceed to cut it, we will have to act on our mask, because we are going to mask (each of the elements that we consider appropriate so that they are not seen).
- There is a color code We will continue to tell Photoshop which areas we want to hide and which of them we want to make visible. We will play with the front and back colors. Every time we work with our front color by choosing black, we will be indicating that we want to mask or hide the area of our mask in which we paint with our brush. Otherwise, if we use white as the foreground color, we will be telling Photoshop that we want to make visible the areas on which we slide our brush or brush strokes.

The polygonal loop
Before we have mentioned this tool, and it is that very seldom should it go unnoticed. In my opinion, after the layer mask alternative, this is the tool that will offer us greater freedom of movement and precision. Surely you remember that when you started using this wonderful application, the polygonal loop was something like a God who saved you in the critical moments of your editing when you needed extract complex figures and make advanced cuts. And it is that, to be realistic, this was in its beginnings the tool par excellence of selection in the jewel in the crown of the publishing programs. Its operation is extremely simple, we will simply have to select it from our tool drawer or from the L command on our keyboard to then move over our image by clicking on the points that will make up our selection. When you give the first point and move with your mouse you will see that a line appears and when you make the second point you will discover that a connecting line has been created between both points that will be the limit of the selection that we are creating. As you can see, his method is extremely simple and is simplified in simple clicks.
However, it is very important that you keep in mind that there are a couple of tricks that can facilitate your work when you act with the Polygonal Lasso:
- Keep in mind that through this alternative we can create completely straight lines that will help us achieve the required precision. We can obtain this perfect straightness in our boundary lines through the key Shift. Of course we can also make use of the rulers and guides tools from our View menu in the upper area.
- On the other hand, you can also check that we can switch between the tool Polygonal Lasso (L) and the «common» Lasso tool from the Alt key (if you use a mac it will be the Option key) at the same time that we click on the right button of our board or pen. This trick is recommended if you are quite fluent with your mouse or your pencil, if not, I would recommend that you try not to alternate between the two modes because it is very likely that your selection will become something much less uniform.
- Within these lasso tools, we also find a third, which is the magnetic loop, although this option is less recommended and will only be recommended for images that have high definition and high contrast limits both at the color and light level.
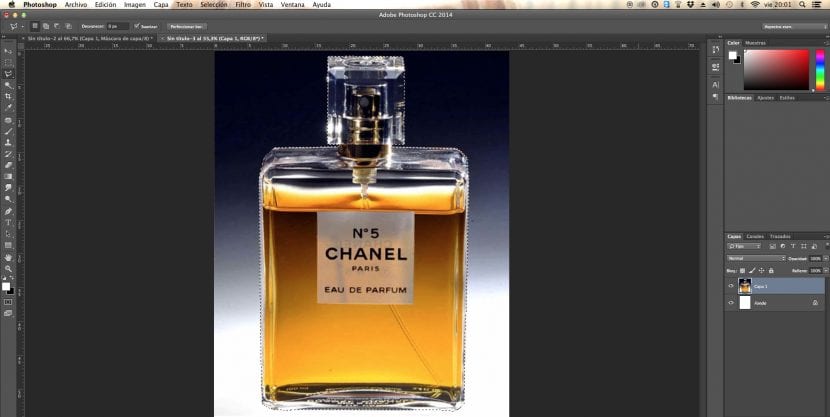
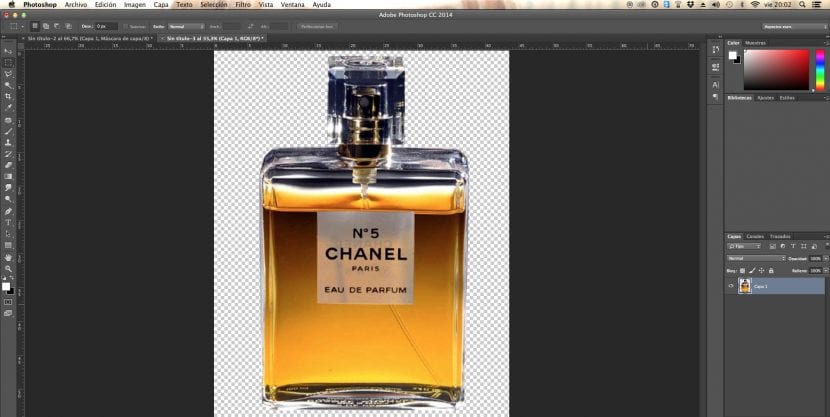
- When you have created your selection with any of these tools, you will discover that the option appears in the upper area Dispel. It is important that we set this parameter to 0 pixels and also activate the smooth option. In this way the cut will be much more natural.
The magic wand
Among the most popular selection tools found within Adobe Photoshop, is the magic wand. However, let me tell you that its use is discouraged in a high percentage of occasions. The reason is very simple. This tool was designed to create selections from a simple click and based on chromatic parameters. Thus, those areas that are made up of the same tonality will be included within the selection from a click.
You will already be realizing which are the weak points that this option provides us and that is that when we work with high quality images, it will almost certainly be that the areas that compose it are filled with an immense variety of hues. Keep in mind that probably where our eye perceives a uniform color, it is most likely that a large number of tones are inscribed within it. This is what happens, for example, with the sky. There are many images that present large areas of blue in the skies, however when working with these types of selection tools we discovered that what looked like a direct and homogeneous blue is actually composed of infinite blues.
That is why always obtaining an accurate selection will be the most difficult with the magic wand tool because gradients are implicit and there are tonality changes at the edges of the images and the objects that make up those images. A positive point of this tool is that it allows us the possibility of modulating the sensitivity that our wand will have when selecting colors. It is what we know as Tolerance, a value that is located in the upper area and that we can modify manually. It is recommended that you test this value several times in various areas of your image to ensure which tolerance best suits the resolution of your photo.


With a high tolerance what we will be saying to our application is that within the area that makes up the sky of our image we want to include the blue color on which we are clicking and also all those tones that are close to its chromatic spectrum. We will then include lighter and darker blues. However, this value can also work against you because it can select unwanted areas. Keep in mind that there are leaves of a tree on that sky and they are green, it is very likely that they are also selected with a high tolerance. So you can remove more areas than you need.
I would recommend using this alternative with images that are perfectly chromatically contrasted and have a High Definition. Also that you alternate this tool with the layer masks tool. This way you can save some time and get a precise cut in a tremendously fast way.
You can access the magic wand from the toolbox or from the W command from your keyboard. It is also highly recommended that we activate the smoothing option that appears in the lower area because in this way we can make much more realistic and careful selections.
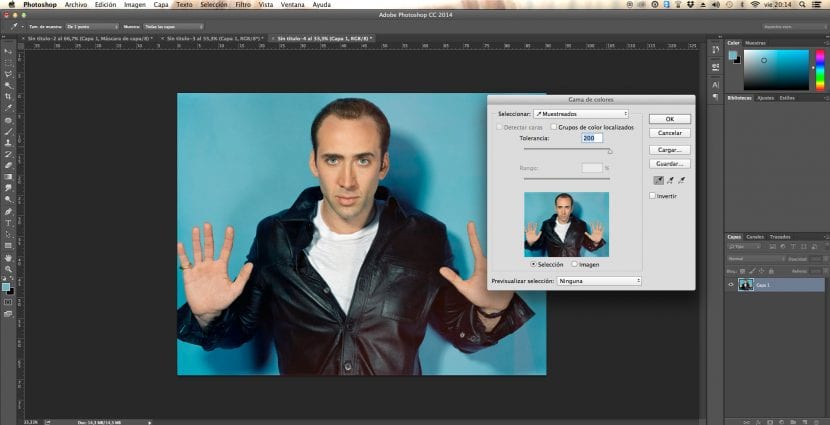
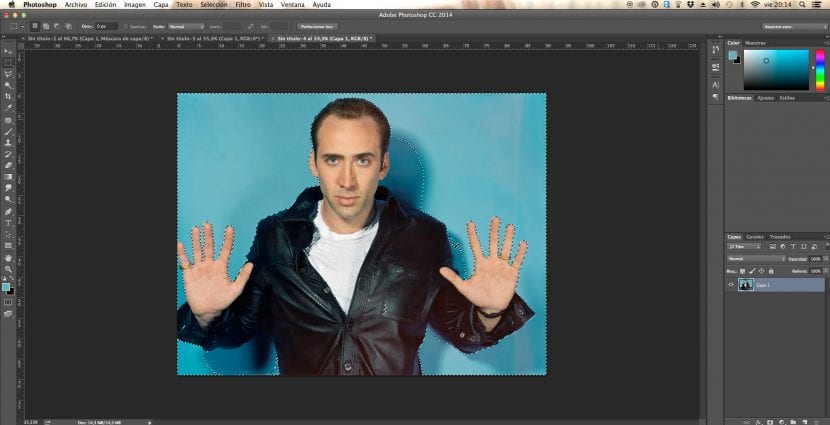
Using the color gamut option
It is no coincidence that I have left these two tools almost to the end, and they are both very similar in the sense that they can be tremendously effective as long as a series of conditions are met. In the same way that in our magic wand it is very necessary that we are working on highly contrasted images The same is true for the Color Gamut alternative. It is a very fast option and can be combined with the rest of the options that we present today. What we will do is take samples of the information at the color level that exists in our photograph again.
The operation of this tool is extremely simple and easy to understand:
- All we have to do is press the key Shift of our keyboard at the same time that we are passing the mouse through the colors that «hinder us» or we want to extract from our image. If we go back to the previous example, the blue of a sky as a background.
- With the Shift key we are ordering our Software to include new tones in our selection, but we can also order the opposite from the key Alt (or option on Mac). Each time we press it, we will communicate to Adobe Photoshop that we do not want certain shades to be included in our selection.
To achieve more precise selections it is recommended that we focus on the location of the color groups. We will not go to the Selection menu and we will choose the Color Gamut option ... and then deactivate the Localized Color Groups option. As we had done with the Magic Wand tool, it will be very important that we learn to play and modulate with the tolerance option to obtain the best result in any image.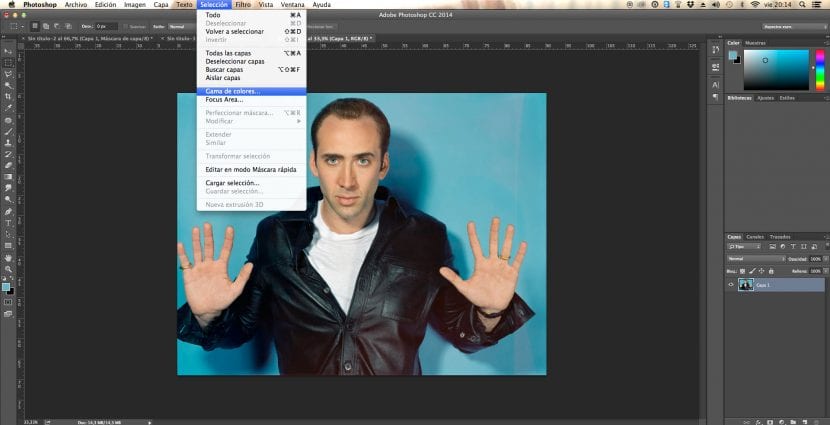
The pen tool
Although it is true that the pen (P) is perhaps the most precise option that Adobe Photoshop presents us due to its ability to perfectly imitate the curvature of the elements that make up our image, it is also true that it is much slower and requires certain technique. This is the option often used by designers who work at a more professional level and strive to achieve a perfect result. in the extractions and cuttings. The system in which the pen works works by paths made through the creation of anchor points. The strong point of this tool is that it allows us an absolutely manual modulation and we will see that when we work on the line that we have just created, it begins to curve depending on the movements that we are including in our path and from our anchor points. Once we know this we can start working on more and more complex layouts. The pen tool has a couple of tricks that are very important for us to take into account because thanks to them we will be able to save considerable time and better control the influence of our tool on the composition:
- Once we have created and defined the position of the anchor points from our selection we can play with them individually, modifying their coordinates. For this we will not need more than to click on our Ctrl key (or Command on Mac) and then move our cursor to determine the new position of our anchor point.
- We can also modify at any time and at any point of our route the curvature of the path resulting. To do this we will only have to click on the Alt key (or Option on Mac) and play with our cursor to manually modify the scope of said curvature.
- We can access any path that we have created with our pen in our composition (regardless of the number of paths that we have created) from the paths tab. These paths are stored in a tremendously similar way to the layers that make up our project and can be modified in a very simple way. To use all these selections we will only have to click on the button «Load path as selection»To convert our recent layout into a ready-to-use selection and extract content from our composition.


The Background Eraser Tool
I personally believe that is one of the star reasons to use Adobe Photoshop, because thanks to this jewel, nothing can stand in your way when it comes to making an extraction, no matter how complex it may be and regardless of your level as a graphic designer. This gem allows us to literally remove any background and although it works by making color samples in the same way that the magic wand or the color range option can do, it works from a pointer. In this way, it unifies in this alternative the freedom of action that the brush gives us with the layer mask and the possibility of acting from the chromatic information of our image. This pointer is capable of storing the tonality that we want to remove and eliminate it from the areas on which our mouse rests. This will leave the areas that we want to keep completely intact and will only act on those that we want to erase.
It also allows us modulate the influence of our brush from the tolerance parameter and modify the size of our brush. Of course, we must practice a lot to avoid that an area to be conserved disappears in a mistake. Its operation is extremely simple:
- Within your layers palette, you must select the layer that you want to cut and that contains the areas that you want to extract.
- Go to the toolbox and choose the tool draft funds. You are in the draft group.
- Click on the brush sample in the top options bar and define the properties you want your brush to contain.
- Choose the mode in which you want the background erasure to occur:
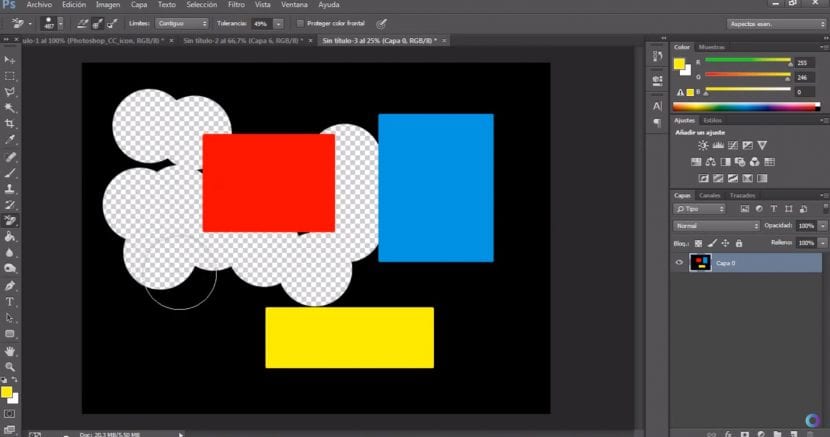
- Mode erase limits:
- If we choose not contiguous the sampled color will be erased every time it appears under our brush.
- If instead we choose the option adjacent the areas that contain that color and are connected to each other will be removed.
- The option Find Edges It will allow us to erase the connected areas that contain the color that we want to eliminate and it keeps the limits of the way we are working as well as possible.
- Choose the most suitable value to work with the tolerance. This data will vary depending on the composition on which we are working.
- Choose the sampling option to configure how our brush will act:
- If we choose continuous, samples will be made continuously whenever we drag our brush.
- The Once option is perfect for removing only the areas that contain the color we originally clicked on.
- Background sample: It will only work with those areas that contain the background color that we have selected.
- Mode erase limits:
- The next step will be to drag across the area that we want to erase.

Excellent methods Fran thanks, Greetings.