
When you have to design a corporate identity you have to be aware that what you do is going to be used. That is to say: if you design an A4 letter, you must bear in mind that the client will have to write on it with the design that you have created.
And how is the client going to do it? The logical and most common thing is that our clients do not use layout programs such as InDesign, so it is our duty adapt our designs to more everyday programs. That is, we have to convert our designs into Word templates that anyone can edit and complete with the appropriate text on each occasion.
Tutorial: turn your design into a Word template
Today we bring you a very short tutorial, very simple and very useful. Generally, we do not know how to pass a design to Word so that it can be worked on. What most designers who do not know the steps that we indicate here tend to do is simply export the .indd file as an image (.jpeg) and then place it in Word as if it were any photograph. But this is not the correct procedure, and it can bring us many headaches (that our template moves, that they do not know how to enter the text, etc).
Follow the steps described below very carefully, and if you have any questions, use the comments area of this post! In this example, we convert an A4 letter design into a Word template.
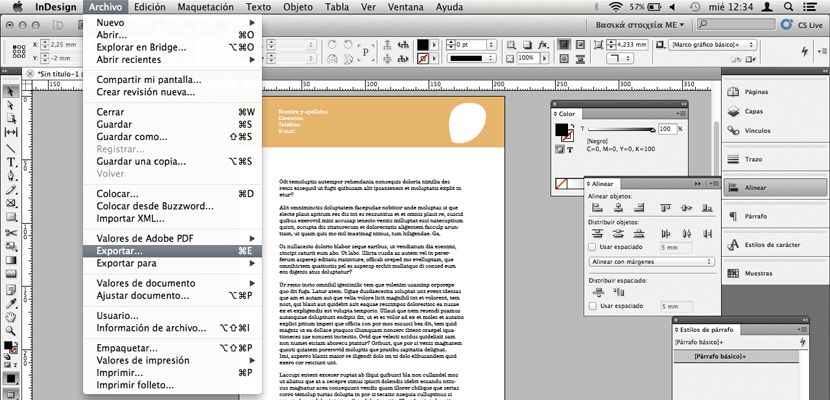
- Open InDesign. To make the design or layout of a typical letter of A4 size, we will select this size for our file (File> New> Document). In the dialog box that appears, as we have already said, in Page size we select the A4 option. We modify the values we want (margins, columns ...) and click on accept.
- Now proceed to make the design that we please. We model text and introduce images as we usually do in this program. Once our design is finished, go to File> Export and save your template in .PDF format

Export your design as a .PDF file (File> Export or File> Export)
- Next we have two options. If you have the Adobe Acrobat program, follow these steps:
- You open the .PDF file in Adobe Acrobat and you go to File (File)> Save As (save as)> Microsoft Word (.doc or .docx)
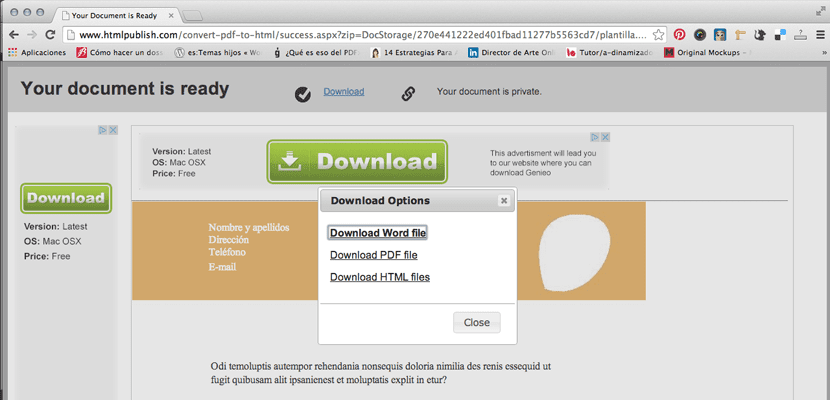
- If you don't have it, you can convert your file online (no download required) directly with the .PDF to Word converter, or if you prefer a program on your computer, get hold of TextExporter. What they will do is the same as Acrobat, convert our .PDF file into the format that Word recognizes. The advantage of these programs is that all the text that we had written in InDesign becomes editable, so it is a very interesting option when we are talking about several pages of a catalog, for example, whose text had to be replaced by the client.
.PDF to Word Converter Page. Upload your file and select the format in which you want to download it (in our case, Word)
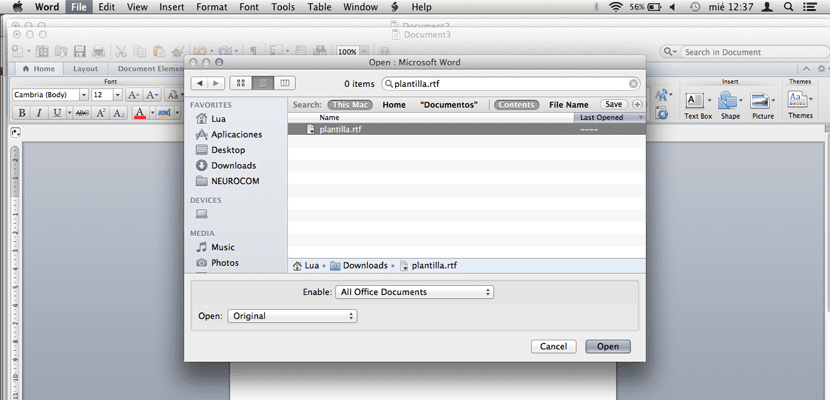
- What's going to happen? The converter will change our font. But we should not worry, since we can change it back to what we say in Word itself. So we go to this program and open the template.rtf file that the online converter has provided us. We'll see everything on your site, except the type. So we select the text and we apply the typography that we want.
Open the document you have obtained in Microsoft Word, as if it were any document
- The next step? It is always good to include instructions To our client. A (write here) is not left over, or at the end of the false text put a (replace this text with the content you want).
When you open it you will find your design on your site and all the editable texts. A joy!
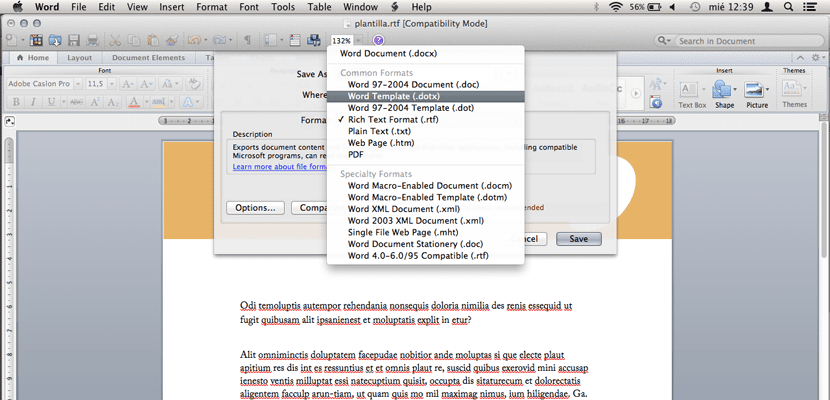
- Finally we have save this file as a template for Word. So we go to File> Save As and in Format we select the Word 97-2044 Template option. We put a name, we choose where we are going to save it ... READY! We already have our design as an editable template in Word.
Finally, save the document as a template for Word. Ready!
If you haven't paid attention to where you saved your template, by default it is in the "My templates" section


thanks for the help, it was just what I needed to know;)
Hello, good day, sorry also applies to Illustrator 2015, is it the same procedure?… Greetings!
This system does not work. As soon as you put a vector logo, or two boxes for subject, date etc. Opening it in word is crazy, everything looks bad and misplaced.